During our visits to Japan, we experienced a culture to which we had no direct connection. Even though the culture was different, there were many touchstones from home. Below are some of the customs about which we learned traveling in Japan.
1. The Language Barrier
Traveling to a land where you neither read or speak the language can be daunting. However, we found that in urban areas that there is enough English present to put you at ease. Virtually all signage has English as well as Japanese, so navigating your way is relatively easy.
Traveling outside of the major urban areas could present more of a challenge when it comes to communicating with locals. For example, we found that Fukushima and Sendai had much less of an English presence than Tokyo or Osaka. These cities offered us our real first taste of being in Japan. Still, in these areas, there were still some reminders of home.
Domino’s Pizza in Fukushima, Japan (Photo credit: Jeff Hayes)
If you plan to travel outside of the more urban areas of Japan, it might be a good idea to load Google Translate (or something similar) on your phone. To be safe, I loaded a version of Translate with a static dictionary, in the event we found ourselves outside of good cell reception.
2. Walking on the left side
The Japanese drive on the left side of the road, and they, for the most part, walk on the left side of the sidewalk, and the left side of stairs. The only large scale exception to this rule we saw was in Osaka, where it seemed customary to walk on the right. Of course, not everyone does this. In Tokyo, this custom seemed less rigid, with people walking on each side (much like you might find in Manhattan). Overall, to be considerate, try to walk on the left side.
2. Interacting with locals
As a rule, it seems as though the Japanese shy away from dealing with foreigners. In urban areas, this not quite as evident as in more suburban or rural areas. In fact, we had a young Japanese woman ask if we needed help purchasing train tickets at Tokyo Station. By contrast, I offered to help an elderly couple in Tokyo carrying boxes that were clearly too large for them. They politely declined and went about their way.
Don’t be insulted if a seat next to you on a train remains empty, even during peak travel times. It’s just their way.
4. Tipping
In Japan, there is no tipping. Unlike everywhere else we have been, the Japanese see tipping as rude or an insult, as though you were paying them extra to do their jobs well. This includes restaurant servers, hotel employees and cab drivers.
5. Eating on the Run in Japan
While most places we’ve been have convenience stores in abundance, there are ubiquitous in Japan. In virtually every urban area we’ve visited, there are 7-11 stores. Just like in the US, you can grab a quick snack or drink. Unlike the US, however, you can actually get a small meal at the 7-11, and even eat it there. In fact, we saw as many people eating at 7-11s as more traditional fast food restaurants.
The 7-11 stores are far from the only convenience stores in Japan. On seemingly every block stood a Family Mart or a Lawsons. These stores have plenty of snacks and drinks too, and some are even located near or within hotels in Tokyo. In addition, there are vending machines almost everywhere, offering drinks and water. If you travels keep you busy, convenience stores and vending machines will keep you fueled until you time for a meal.
Going to a baseball game in Japan is much like going to a game in the US. However, being in a place where we could not speak or read the language did pose some issues not experienced here. Below are a few of the things we learned going to Japanese baseball games.
1. Getting to the ballpark
While the specific directions of how to get to the park are contained in the review of each park, there are a few common themes. First, review the route to the game, including the specific train lines that get you to the park. Sounds simple, but planning could save you some stress later on. Plan to leave early, in the event you miss your train. Many Japanese ball parks open two hours early, and have things to do and see around the park itself.
Baseball parks in Japan are located close to train stations (we’ve noticed very little in the way of parking for cars at the games). We’ve found that most are within walking distance (generally a kilometer or less). If that distance seems excessive, you can probably get a taxi to the game and back.
2. Entering the ballpark
After you arrive, survey the landscape to identify your gate for entry. The tickets we’ve had vary with respect to readability. Some are fairly easy to decipher
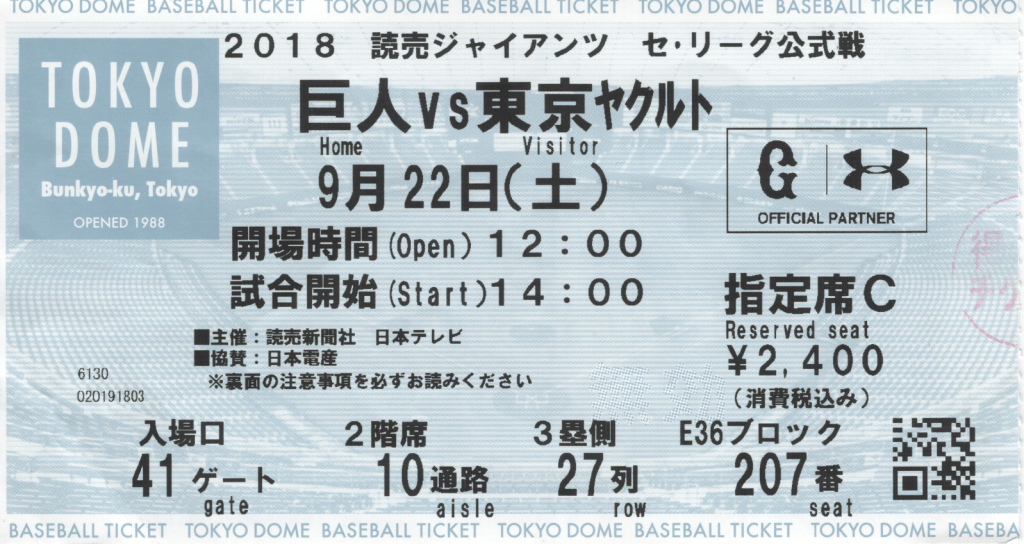
Ticket from the TokyoDome, September 22, 2018
The above ticket was for a Giants game against the Tokyo Yakult Swallows at the TokyoDome on September 22nd, 2018. Note that much of the vital information (gate, row, seat) have English next to them, making navigation fairly easy.
Ticket for Miyagi Park in Sendai, Japan, Thursday, April 4, 2019
However, most of the tickets we received looked more like the ticket above. The gate number, row and seat are decipherable, but not easily as the ticket for Tokyo. If you are unsure which gate to enter, simply ask. In the case of the above. I handed the ticket to a security guard, who pointed me to the correct gate. Once inside, keep handing your ticket to staff members until they bring you to your seat. (FYI; there is no tipping in Japan)
Unlike American ballparks, the Japanese stadium setup usually restricts you to the section in which your seat is located (with the TokyoDome being an exception). This hampered our ability to get as many pictures as we would have liked.
3. Food
One of the major differences between American and Japanese ballparks is the cuisine. As you might expect, the menu is dominated by Japanese fare (though some parks did offer hot dogs). My palate is not very sophisticated or varied, so I shied always from much of what was available. However, bento boxes were popular, containing vegetables, rice and fish.
Ordering can be a challenge, given the language barrier. In Tokyo, there was enough recognition of English to allow for rudimentary conversations regarding ordering food. Elsewhere, we’ve seen most ballparks offer a picture book of the selections. Often pointing to the book and indicating the desired quantity with fingers accomplished the task. The vendors are typically very helpful, and I didn’t face a situation where I couldn’t get what I wanted from the concession stand.
Drinks can also be obtained at the concession stand. We discovered there is no diet soda (as we know it) in Japan, but zero calorie soda is available. We mostly drank water, which is a must when traveling through Japan in the warm season.
We didn’t see too many vendors selling food in the crowd, but there were people delivering drinks. Dubbed beer girls, there were dozens of young women hawking alcohol, wearing brightly colored shirts and carrying packs on their backs.
4. Souvenirs
Like ballparks in America, each of the ballparks we visited had a team store. Most of the team stores had a selection of apparel you might find in a team store in the US, as well as programs, yearbooks and baseball cards. In addition, the stores had items that appeared to be more popular in Japan than back home. These items included pom poms, dolls and noise makers shaped like cones (which the crowds put to good use during the games).
DeNA BayStars team store in Yokohama Stadium. (Photo credit; Jeff Hayes)
However, for the avid baseball fan, the team stores often seemed to lack a greater variety of hats, jerseys and pictures. My brother Jeff found that larger teams stores were often found outside of the ballparks. For example, there are two team stores in Sapporo (home of the the Hokkaido Nippon Ham Fighters). The team store for the Sendai Rakuten Golden Eagles is down the road from their ballpark, and the team store for the Seibu Lions is on the 8th floor of the Seibu Store in the Ikebukuro section of Tokyo. If you seek a larger selection of team items, especially hats and jersey, you should Google the location of the official team stores.
In the previous post, we covered some of the aspects of planning the trip we felt were important to prepare you for the journey. In this post, we will review some of the things we discovered about traveling while you are in Japan. Hopefully these tips can make your travels easier.
1. Getting to where you are staying from the airport
If you arrive at Narita Airport (where most international flights arrive), the best place to get to where you are staying is the Narita Express. This limited express train gets you from Narita to Tokyo area locations. You can make reservations online, which is remitted at Narita, or you can make the reservation once you arrive in Japan.
We recommend Googling the station nearest your hotel, and determining the distance between the two. If you are unsure of how to get to the hotel from the train station, we recommend taking a taxi. Tell the driver the name of your hotel, and they will know how to get there. The taxi stands are clearly marked, though it is possible that some cabbies may shy away from transporting foreigners (try not to take it personally). Taking a taxi after a long flight might be the easiest way to conclude your travel day.
2. Using Mobile Devices in Japan
During our previous two trips to Japan, we simply used our phones with an international data plan from Verizon. The plan, for $10 USD a day, we made calls, texted and surfed the Web, using Verizon partner networks. Each day we used data on our phones, we were charged the $10; if we didn’t, we were not charged. Our 8 day stays therefore cost $80 for data, text and call. In most places, the cell coverage was sufficient to meet our needs. However, there were times when the drop off in coverage caused some issues using a Google Maps while using the Tokyo area trains.
In preparation for our upcoming return to Japan, I have been researching alternatives. Using a SIM card with my locked iPhone appears to be more of a hassle than it’s worth, but others have been ingenious to work with the iPhone to get the SIM cards to work.
The other alternative seems more attractive: a portable WiFi router. Research points to the same provider as being the best in Japan: Japan Wireless. For our 8 day visit, the cost would be about $60 USD. When we experiment with this option during our next rip, we will provide more information.
3. Using Tokyo area trains
If you plan to use train services in the city in which you’re staying, get a Suicacard. The card can be obtained at any JR East station, and can be used on JR East trains, subways and buses, as well as some vending machines and taxis. We found the card to be invaluable when navigating the subway. On our first trip to Tokyo, we used tickets obtained at a kiosk. This approach meant accurately determining your destination beforehand, and tabulating the cost before getting the tickets. This approach proved cumbersome, and my brother’s research provided a better alternative.
The Suica card can be purchased at any JR Rail or local/regional train station, at the black kiosks, which have English buttons. You can preload any amount up to 10,000 yen (which is roughly $100 USD), and you are ready to go. The Suica card can be used at any turnstile labeled with IC, even if it is Passmo or other service is in the area, as well as any Tokyo Metro train. Just swipe the card as you enter the station, and swipe out as you exit (much like metro areas in the US). The card doesn’t expire, and you can reload the card at the train station as well.
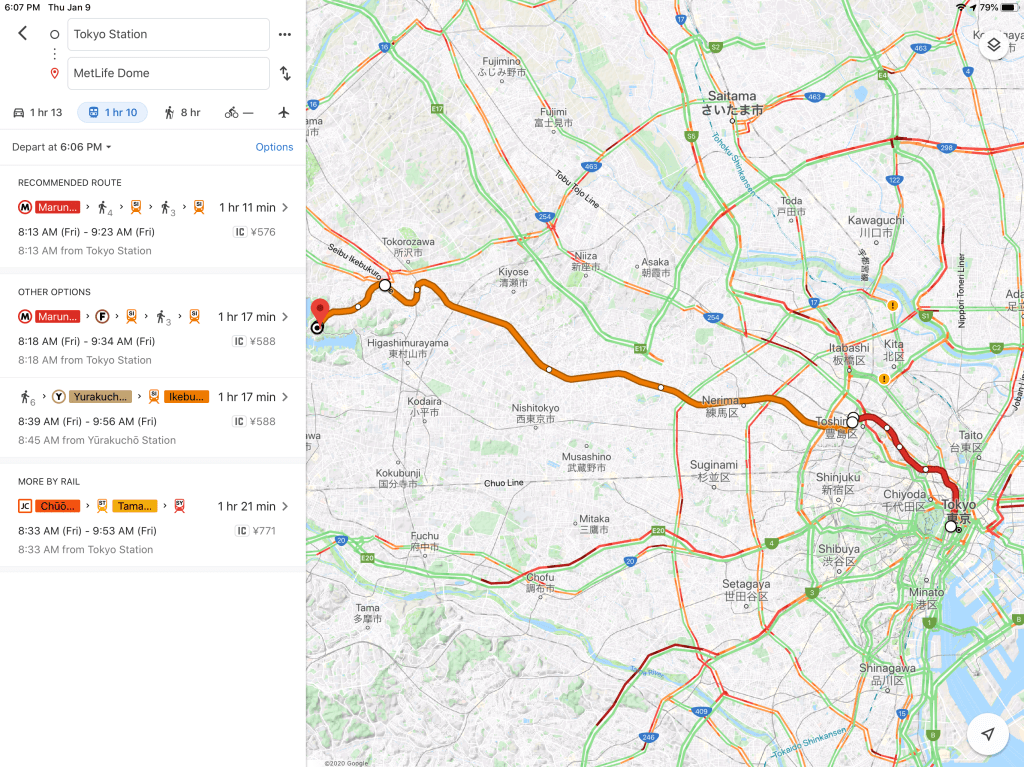
Make sure you have Google Maps on your phone before you get to Japan. We discovered that this app provides incredibly detailed information about train service. For example, after choosing your starting point and destination, selecting the train option tells you which train to catch, on which platform and when the next train arrives
Type in your starting point (if it’s not your current location) and your destination. Google Maps will offer a few ways to get there. After choosing one of the routes, Google Maps provides very detailed instructions for getting to your destination.
It might save you some time and stress if you review your route choices in Google Maps BEFORE you travel. Japanese trains stations can be difficult to navigate, even for locals. Leave yourself some time to acquaint yourself with the station, and don’t be surprised if you experience some frustration trying to navigate the station. Don’t worry too much; you’ll figure it out.
Finally, it is worth noting (for people who have difficulty getting around) that there are not many places to sit in Japanese train stations. Fortunately, there are usually escalators within the stations, but you can still expect to have to climb stairs in Japan.
4. Using the Bullet Train (Shinkansen)
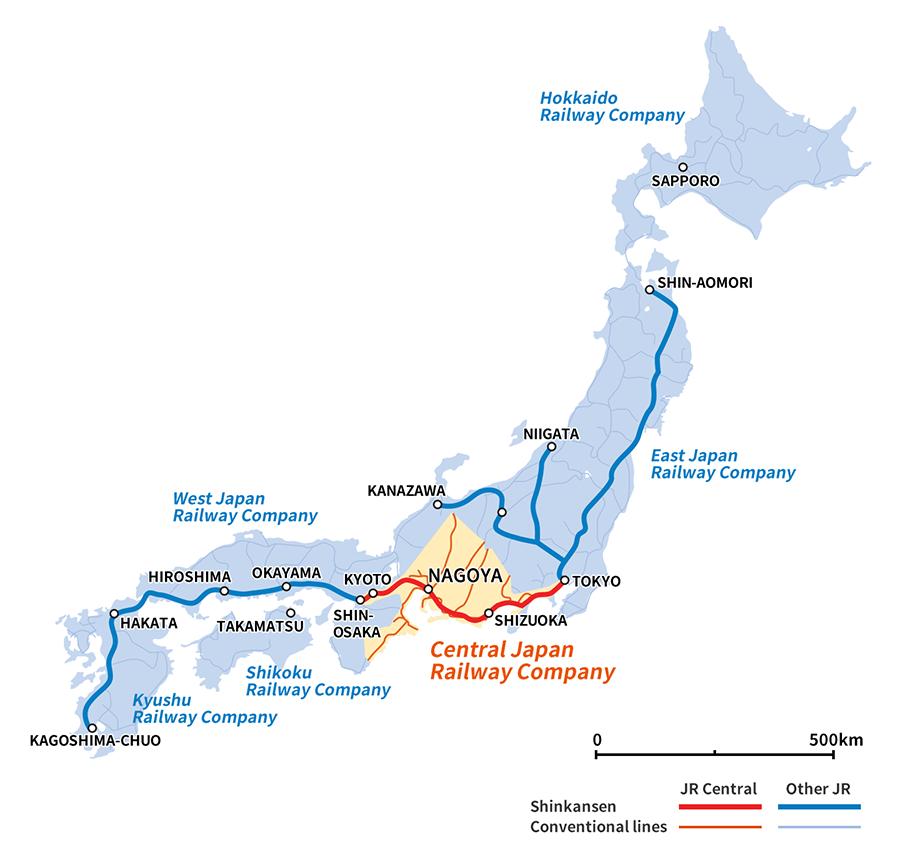
If you have not done so , you want to plan your travels on the Shinkansen. Japan Rail (JR) operates bullet trains on JR East and JR Central, the lines you are mostly like to use. As mentioned earlier, there are two good sites to use when planning your travels (for travel from Tokyo and east, for travel fromTokyo and west).
Map of the Japan Rail bullet train routes
To begin your journey on the bullet train, take your JapanRail pass and make a reservation at the nearest JR Rail Ticket Office (or Travel Service Center). Tell the representative the your destination and preferred travel time, and you will be issued a ticket for a reserved seat. For a Green Card holders, your reservation will be in a first class car, which are typically less crowded and quieter (which, for me, was worth the upgrade). Making a reservation guarantees you seat; otherwise, you may not get a seat on the train car you wish.
Check the information boards for your track (if the representative does not tell you). From what I’ve seen, all of the train information is displayed in Japanese AND English. Head to the gate, and once you arrive, keep to the right of the turnstiles. Show your JapanRail Pass to the JR representative, who will wave you through. At the gate, you will see lines on the floor, showing you where to stand for entry into your car number (listed on the ticket). If you have a Green Card, there is a good chance you will need to look for Car 8.
Once aboard, find your seat. If you are carrying luggage, be aware that you can carry 2 pieces of baggage on JR trains. The total of height+width+depth of each item must be under 250 cm and the weight less than 30 kg per bag. This is because there is limited overhead storage space in the cars. Starting in May 2020, if you have oversized luggage, you must make a reservation for a seat with oversized storage (which is free)
The Japanese are immensely proud of their train system, and it shows. People from around the world come to Japan just to ride the bullet train. The accommodations are comfortable, and the ride smooth and quiet. Most cars have power outlets for charging devices, and some of the trains offer drinks and snacks. Phone conversations are discouraged; if you need to make a call, head to the vestibule.
Service announcements aboard the train are in Japanese and English, as is the signage. Announcements concerning the next stop occur well ahead of time. Timeliness is a staple of the bullet train, and each announcement ask you to be prepared to exit the car BEFORE the train reaches the station.
Task list
1. Look for the Narita Express once you land in Japan. You might want to check out the website to find the stop closest to where you are staying beforehand.
2. Determine how to use your phone to communicate in Japan. We used our Verizon iPhones with the International plan, but obtaining a WiFi router may be a cheaper and better alternative.
3. Get a Suica card as soon as possible. It helps traveling on Tokyo area travels better. Also use Google Maps to make navigating the train routes much easier.